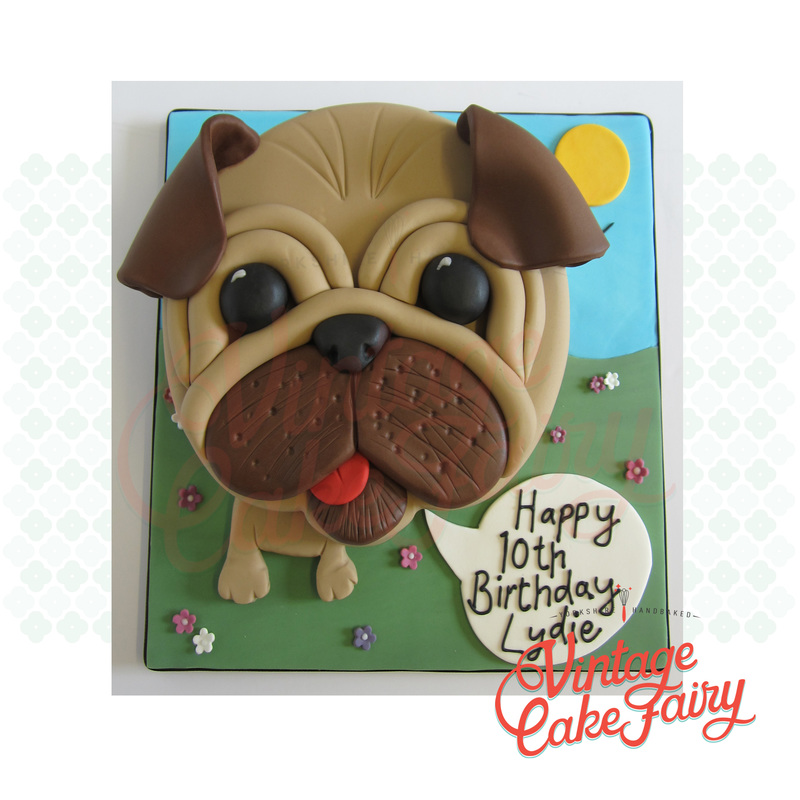
Pug Dog Birthday Cake
|
The Story behind this Cake
This cake is so very simple but really effective. Unfortunately, I only have one photo, as I managed to lose the making of photos, so you will have to try and bear with me whilst I try and explain how I made it.
Firstly, I started with a basic 8" round cake and using a template I had drawn on greaseproof paper I cut out the chin details. I then covered it in teddy bear brown renshaw ready to roll icing and left it to dry overnight. The next morning I covered the cake board in blue 'sky' and green 'grass' and ribboned the edge. I next started to make the face details, using chocolate brown Renshaw ready to roll icing , I rolled a ball just smaller than a golf ball and then flattened out one side, I stuck this to the cake using edible glue and then using a modelling tool made 'fur' lines and flattened it to shape. I then used some poppy red icing and cut out a tear drop shape and stuck this to one side of the chin, I made a centre line for the middle of the tongue. Next I made the cheeks, using a ball (satsuma size) of chocolate brown gently roll it into a sausage shape, using the heal of your hand gently flatten out the sausage shape until you get the correct size to cover one third of your cake, repeat for the other side and then stick these on the cake, make sure you cover the top edge of the chin and tongue. Now using some jet black icing again roll a ball just smaller than a golf ball and gently make a tear drop shape, stick this to the centre top of the check to make the nose. Using your modelling tool make nostril indents and add fur and whisker details to the cheeks. Using the teddy bear brown icing, roll a sausage roughly 1cm thick and long enough to go along the top of both cheeks and nose, smooth the edges to continue the curve of the cheeks. Roll two balls of jet black icing about 2cm diameter for the eyes and position these on the cake. Roll another sausage of teddy bear brown, again about 1cm thick and position around each eye, do this twice and then smooth the edges down. Now to make the ears, roll out some chocolate icing to a 1/2 centimetre thickness and cut out two rough triangles, slightly smooth two of the edges and round off the point. Paint sugar glue to the remaining side and stick to the top edge of the cake, bend the point over and secure to the cake. Repeat for the other side. Using your modelling tool draw six fur lines over the forehead of the dog. The face is now complete! Yay! If you wished to add the little body- Make a template from an existing photograph using parchment paper, roll out some teddy bear brown icing, to a rough 1/2 centimetre thickness and cut out around the template. Place this on the cake drum and make sure it fits snuggly up to the cake edge. Smooth the edges and using your modelling tool draw in creases and toe details. Add blossom cut out in various colours to the green area and a speech bubble for your inscription. Also you can add the sun, by cutting out a circle of yellow and placing it in the top corner. Finally, using a number 2 nozzle filled with white royal icing, pipe a teardrop shape on to each eye for the highlights, add your chosen inscription and the cake if finished! Share a cake by The Vintage Cake Fairy |
Must Have for this Cake
|
|
|
|


