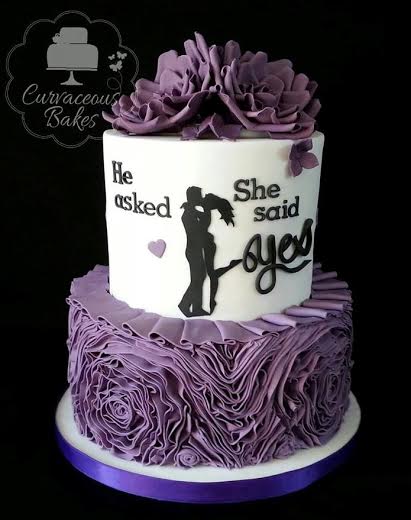
'He Asked, She Said Yes' Engagement CakeRecommended Tutorial for the Rose |
The Story behind this Cake
This cake was made for my own engagement party. I wanted something that had a wow factor and that also was elegant.
I have seen many Ruffle cakes about and have been wanting to try out the technique for months. I found a tutorial by Sharon Wee Creations which really helped me to create the ruffles. I covered my cake in layer of fondant first and then started adding on the fondant ruffles. Had I known how long they would have taken I may not have started!! Several hours later it was complete. I loved the look of it! I had one of those moments where you sit back look at a cake and just can't help but smile and squeal in delight as the image in your head is created in front of you. For the top tier I wanted to do a silhouette but I wanted it to look different as there are so many of the same engagement silhouette cakes out there ( The man one bended knee) I also loved the look of some invitations and engagement photo shoots I had seen that had the words 'He asked, She said Yes' and fell in love with the wording. I created two sketches one of which had the lettering in the middle of the top tier and one which had a silhouette (the man on bended knee as I hadn't found the silhouette I wanted) I posted this to a closed cake group I am in on Facebook for their in deciding which one to go with as I loved them both! The response was amazing, I had a couple of hundred likes and several hundred comments most of which suggested I either had one on the front and the other on the back to create a two sided cake or to merge the two themed together. So I merged them together and feel in love with the design again! I wanted the 'Yes' part of the saying to really stand out, as most of mine and my Fiancés friends and family have waited for the engagement for a while :) I chose to do this lettering freehand by rolling out a thin rope of fondant and laying it over a font I had found and printed out to the size I needed. I did not buy the Silhouette. This was done by finding an image on google that I liked, printing off at the correct size and cutting it out by hand on to fondant. The rose's on the top finished the cake of perfectly, and was another technique I was desperate to add after seeing McGreevy's Rose tutorial on YouTube not having had the chance to practice them yet. The top tier was a vanilla sponge with vanilla buttercream and raspberry jam. The Bottom tier was a chocolate sponge with a vanilla buttercream. The cupcakes were lemon, vanilla and chocolate orange. I designed the printed topper myself to match the theme of the top tier and left the other cupcakes fairly basic as not to distract from the main cake itself. Share a cake by Curvaceous Bakes |
- Home
- About
-
GALLERY
- Baby Shower Cakes >
- Baptism Cakes >
- Wedding Cake Ideas >
-
Birthday Cakes
>
- Beauty and the Beast Birthday Cake
- The Pink Mini Machine Birthday Cake
- Princess High Heel Shoe Birthday Cake
- Chilled Out Gardener Birthday Cake
- Ariel Birthday Cake
- Frozen Coronation Tiara Birthday Cake
- Yellow Roses and Lace 65th Birthday Cake
- Surprise Handbag Birthday cake
- Horse Birthday Cake
- Vintage 21th Birthday Cake
- Teddy Bear Two Tier Birthday Cake
- Camper Van Birthday Cake
- Call of Duty Black Ops Game Birthday Cake
- Game Night Birthday Cake
- Giraffe Birthday Cake
- Lace Handbag Birthday Cake
- Whimsical Woodland Birthday Cake
- Animal Theme 1th Birthday Cake
- Frozen Birthday Cake
- Coach Purse Birthday Cake
- Rustic Country Themed Birthday Cake
- Boy Frozen Birthday Cake
- Princess Castle Birthday Cake
- Pirate 1th Birthday Cake
- Koi Fish Birthday Cake
- 3d Rainbow Sponge Minion Birthday Cake
- Carousel Birthday Cake
- Taylor and Wilson Cat Birthday Cake
- Lego Birthday Cake
- Graffiti Birthday Cake
- Tigger 3rd Birthday Cake
- Dual Naked Birthday Cake
- Disneyland Castle Birthday Cake
- Harry Potter Book Birthday Cake
- Georgie's Castle 4th Birthday Cake
- Sweet 13th Makeup Birthday Cake
- Number Blocks Birthday Cake
- \\"Ticketeeboo\\" Yacht shaped Birthday Cake
- Frozen Themed Birthday Cake
- Fairy Doll Birthday Cake
- Boys NERF Birthday Cake
- Sweet 15th Butterfly Birthday Cake
- Superhero Birthday Cake
- Geisha and Cherry Blossoms 40th Birthday Cake
- Fancy Nancy Birthday Cake
- Wildflower Basket Birthday Cake
- The iPhone Birthday Cake
- Under the Sea Birthday Cake
- Finding Nemo Birthday Cake
- Lydie's Pug Dog Birthday Cake
- Alice in wonderland 1st Birthday Cake
- Magical 3D Unicorn Birthday Cake
- Wedding Anniversary Cakes >
- Engagement Cakes >
- Special Occasions >
- Cookies & Cupcakes >
- Tutorials
- Share a Cake
- Blog
- Store

