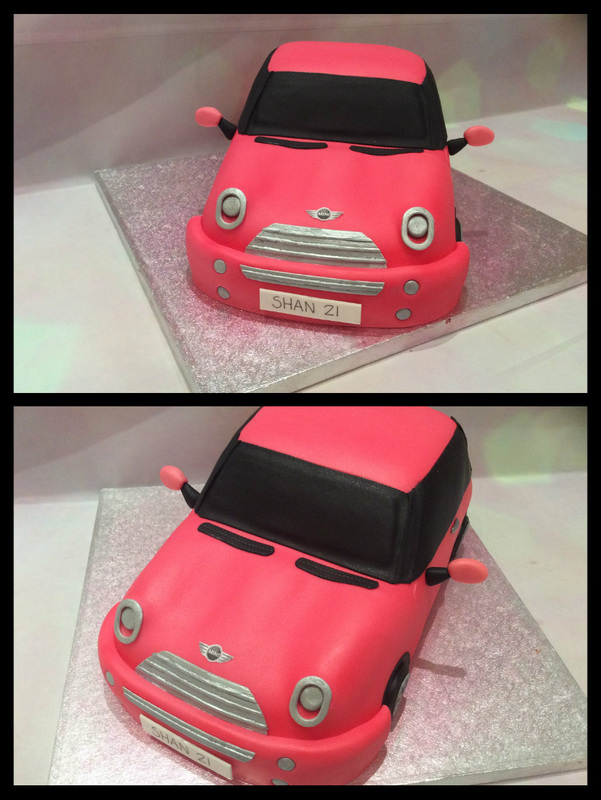
The Pink Mini Machine Birthday Cake
|
The Story behind this Cake
This is a story all about a cake that started looking one way, but was then transformed! I had never done a car cake before, but relished the challenge to create such an iconic make of car - The Mini!.
Step 1-4I made an 8" Square and a 7" square cake. Put the 7" on top of the 8", cut the excess down one side of the 8" and built the front out abit and carved the shape I wanted, adding holes for the wheels. I ganached it and was pleased with the smooth finish I had achieved, then I covered it in white fondant as I was going to airbrush in the black bits and then overall pink. At this point I was happy, but not excited. So the black airbrushing didn't go quite to plan, I thought I'd masked enough but ended getting some spray on the bonnet. No worries I thought, I'll airbrush with the pink and you won't see it, but no. Then on top of that I didn't like the bonnet, I had been looking at more pictures of Minis and it wasn't long enough and the top shape was all wrong.
Step 5-8So - I stripped off the fondant on the bonnet. I thought I'll fix that and re-fondant. But I STILL wasn't happy,I didn't like where I had positioned the wheels, after looking at more pictures of Mini's in fact what did I like?
I went back and forth in my mind and then just did it - I stripped the whole lot, removed all the fondant, obviously damaged the ganache underneath so had to re ganache it all again, but once I had done that I was then happy with the shape, really happy, I could see the Mini in the cake. Finally I had a cake that I could work with. I decided it would be better to cover in pink fondant and add the black detail with black fondant. Once I had covered it in pink fondant I wanted a brighter pink, so I airbrushed it all over and got just the right shade. In the end it was the detail. Each bit cut by hand and slowly it came together. I was finally happy with my first car cake. So what did I learn. My Tip For you:
Share a cake by Alana Lily Chocolates & Cakes |
- Home
- About
-
GALLERY
- Baby Shower Cakes >
- Baptism Cakes >
- Wedding Cake Ideas >
-
Birthday Cakes
>
- Beauty and the Beast Birthday Cake
- The Pink Mini Machine Birthday Cake
- Princess High Heel Shoe Birthday Cake
- Chilled Out Gardener Birthday Cake
- Ariel Birthday Cake
- Frozen Coronation Tiara Birthday Cake
- Yellow Roses and Lace 65th Birthday Cake
- Surprise Handbag Birthday cake
- Horse Birthday Cake
- Vintage 21th Birthday Cake
- Teddy Bear Two Tier Birthday Cake
- Camper Van Birthday Cake
- Call of Duty Black Ops Game Birthday Cake
- Game Night Birthday Cake
- Giraffe Birthday Cake
- Lace Handbag Birthday Cake
- Whimsical Woodland Birthday Cake
- Animal Theme 1th Birthday Cake
- Frozen Birthday Cake
- Coach Purse Birthday Cake
- Rustic Country Themed Birthday Cake
- Boy Frozen Birthday Cake
- Princess Castle Birthday Cake
- Pirate 1th Birthday Cake
- Koi Fish Birthday Cake
- 3d Rainbow Sponge Minion Birthday Cake
- Carousel Birthday Cake
- Taylor and Wilson Cat Birthday Cake
- Lego Birthday Cake
- Graffiti Birthday Cake
- Tigger 3rd Birthday Cake
- Dual Naked Birthday Cake
- Disneyland Castle Birthday Cake
- Harry Potter Book Birthday Cake
- Georgie's Castle 4th Birthday Cake
- Sweet 13th Makeup Birthday Cake
- Number Blocks Birthday Cake
- \\"Ticketeeboo\\" Yacht shaped Birthday Cake
- Frozen Themed Birthday Cake
- Fairy Doll Birthday Cake
- Boys NERF Birthday Cake
- Sweet 15th Butterfly Birthday Cake
- Superhero Birthday Cake
- Geisha and Cherry Blossoms 40th Birthday Cake
- Fancy Nancy Birthday Cake
- Wildflower Basket Birthday Cake
- The iPhone Birthday Cake
- Under the Sea Birthday Cake
- Finding Nemo Birthday Cake
- Lydie's Pug Dog Birthday Cake
- Alice in wonderland 1st Birthday Cake
- Magical 3D Unicorn Birthday Cake
- Wedding Anniversary Cakes >
- Engagement Cakes >
- Special Occasions >
- Cookies & Cupcakes >
- Tutorials
- Share a Cake
- Blog
- Store

